Minimalist's Data Stack: Integration pipelines with dlt


The roadmap for data-driven transformation
The ePaper shows you strategies, success stories and a checklist for a direct start into the digital future.
This series sets out to build a fully functional yet lean data platform, using mostly open source tools that scale all the way from prototype to enterprise application.
- Part 1: The basics of the Minimalist’s Data Stack
- Part 2: Setting up integration pipelines (this part)
- Part 3: Automating integration and writing to storage
- Part 4: Designing and implementing your data model
- Part 5: Adding documentation and observability (to be released)
The full code for this story is available on GitHub.
A look at the blueprint
Let’s put a face to the first foundational building block of the Minimalist’s Data Stack. We will be using dlt to move data into our data storage:
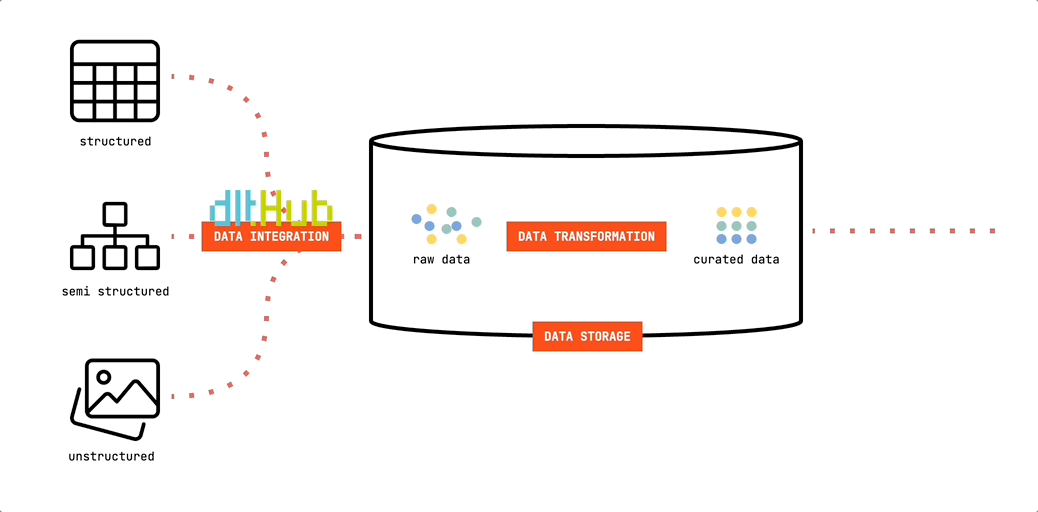
dlt (data load tool) is an open-source Python library offering interfaces to extract data from APIs, databases, cloud storage or a number of commonly used industry tools, such as Airtable, Google Ads and many more.
Since it’s Python based, you’re free to run it in any environment that can execute Python scripts. This offers great flexibility. You can easily develop and test your pipelines on your computer. And they are just as easily deployed to cloud resources or orchestrators such as Airflow, Dagster or Prefect. In our minimalist setup, we’ll be using GitHub Actions to run our pipelines. Lean. And free.
Our use case
To make the example as tangible as possible, we’ll be rebuilding The Data Institute’s own data platform. You see, we’re not just telling you about any random technologies here. The blueprint in question is actually powering our inhouse analytics!
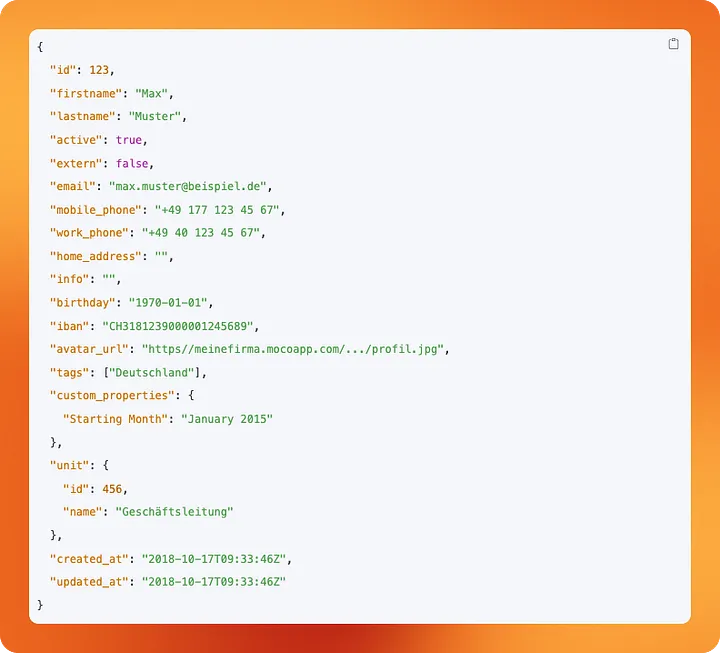
We’re a consultancy business. As such, every consultant has to track the hours they’re spending, as the billable ones will be put on invoices for our clients. At the backbone of our operations is MOCO, a swiss made ERP system specialized for agencies. To get our hands on data about our employee’s activities and the projects and clients we spend our time on, we’ll be using MOCO’s REST API.

Setting up our Python project
Our core principle to do things right from the very beginning not only applies to building the data platform itself, but also to each of its components. As such, we will be using uv as a project and package manager for our Python project. If you're curious about why it's a good idea, give this article by Thomas Bury a read.
If you have Python installed already, you can use pip to install uv:
bash
pip install uv
Otherwise you can use curl on Mac and Linux to download and execute the installation script:
bash
curl -LsSf https://astral.sh/uv/install.sh | sh
On Windows, install with PowerShell:
powershell
powershell -ExecutionPolicy ByPass -c "irm https://astral.sh/uv/install.ps1 | iex"
Further information can be found in uv's documentation: Installation.
Initialize a new uv project
Using uv we initialize a project named dlt-pipeline:
uv init dlt-pipeline
This will create a barebones project structure.
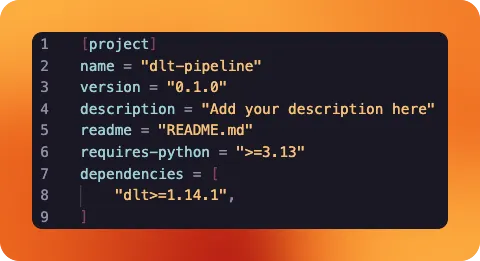
dlt-pipeline├─ .python-version├─ main.py├─ pyproject.toml└─ README.md
We can directly go ahead and delete main.py — we’re not going to use it. README.md will later hold our project description. pyproject.toml is a summary of our Python project and also keeps tracks of all the project’s dependencies. Currently, there are none.
Install dlt
Using uv, we will add dlt as a library to be used in our project:
uv add dlt
You will notice that uv automatically adds the library to our project’s dependencies in pyproject.toml. If someone else were to run this project with uv, all these dependencies would be automatically installed. This makes it a lot easier to share projects and collaborate on them.
uv also has created a virtual environment for our project now: You will notice a .venv folder has appeared. All our project's dependencies are installed there, keeping your global Python installation clean.
Setting up our dlt project
It is now time to turn your Python project into a dlt project. For that, we'll create two folders within our repository: `.dlt` and `sources`.
The former will hold configuration files and store secrets, the latter will contain our actual pipeline code.
Within the `.dlt` folder, we create two files called `config.toml` and `secrets.toml`. In `sources`, we create a `moco_pipeline.py` file.
Since we will be dealing with secrets and want to avoid accidentally storing them in our repository, we want to make sure that we add `secrets.toml` to our `.gitignore` file, too.
Review the project structure
At this stage, your project should contain all of the following files:
dlt-pipeline
├─ .dlt
│  ├─ config.toml
│  └─ secrets.toml
├─ .venv
├─ sources
│  └─ moco_pipeline.py
├─ .gitignore
├─ .python-version
├─ pyproject.toml
├─ README.md
└─ uv.lock
As uv also has created a bunch of files and folders automatically, let's take a moment to review the files contained in our project at this moment:
.dltandsecrets.toml: This folder contains configuration files for dlt. It looks intosecrets.tomlto find the credentials required to access our data sources and destinations..venv: This folder contains our installed libraries. We don't need to touch it or think about it further, asuvhandles everything for us.sourcesandmoco_pipeline.py: We're using a dedicated folder to store our pipeline code. Each pipeline gets its own.pyfile. This way, we can keep our project organized even when we add multiple pipelines to it..gitignore: This file tells our version control which files should be excluded from it. Some of its content are filled byuv, others (likesecrets.toml) we should add..python-version: Tellsuvwhich version of Python our project uses for its virtual environment. We don't need to touch this file.pyproject.toml: Summarizes our project. When we useuvto add libraries, it keeps track of our dependencies for us.README.md: Allows us to give instructions on how to use the project to others or our future self. Make sure to use it as an exercise to revisit what you've learned in this guide!uv.lock: Is yet another file automatically generated byuv. It is used byuvto replicate the exact setup you have across different installations of the project. We shouldn't touch this file.
Extracting data from our REST API source
By using dlt's REST API source, we can avoid reinventing the wheel. Instead, we get a template that we can quickly adapt to our needs and have data extracted from our source within minutes. It works with any REST API out there, even niche ones like our agency ERP application.
We will now build our moco_pipeline.py file in the sources folder step by step.
Importing the required libraries
python
import dlt
from dlt.sources.rest_api import RESTAPIConfig, rest_api_resources
from datetime import datetime
We import the main dlt library.
Further, we import specific classes for working with REST API data sources: RESTAPIConfig is a configuration class that allows to define how we connect to and extract data from REST APIs. rest_api_resources is a function that creates dlt resources from REST API endpoints based on configuration we provide.
datetime is a standard Python library to work with times and dates. We will be using this to control which timeframes of data are extracted.
Define the dlt source
We now have to define our REST API source. We'll break it down piece by piece first, before putting it together in its entirety.
python
@dlt.source
def moco_source(api_key=dlt.secrets.value):
    initial_value = "2024-04-01T00:00:00Z"
    today = datetime.now().strftime("%Y-%m-%d")
We start by defining a function called moco_source() with an api_key parameter that gets its value derived from dlt's secret management. We use the @dlt.source decorator to register this regular function as a dlt data source. It is required to use this function in pipelines.
Then we define two variables to be used in the function. initial_value designates our starting point. It is the date The Data Institute was officially starting operations, but we had time bookings before. We want to ignore these. today simply contains the current date and helps us to filter out "future" bookings, as some of our employees already put in meetings and events they have in their calendar.
config: RESTAPIConfig = {
    "client": {
        "base_url": "https://thedatainstitute.mocoapp.com/api/v1",
        "auth": {
            "type": "bearer",
            "token": api_key,
        }
    },
    ...
We now define a variable config that is of type RESTAPIConfig, which we have previously imported from dlt. The value of the variable is a Python dictionary.
The first entry in the dictionary is client, itself another dictionary. It defines our REST API client, which base url to use and how authentication should be handled. We are using a bearer token and get the value from the functions api_key parameter. Remember that this one points to dlt's secret management.
    ...
    "resource_defaults": {
        "primary_key": "id",
        "write_disposition": "append",
    },
    "resources": [
        {
            "name": "users",
            "write_disposition": "replace",
            "endpoint": {
                "path": "users",
            }
        },
        {
            "name": "activities",
            "endpoint": {
                "path": "activities",
                "params": {
                    "updated_after": "{incremental.start_value}",
                    "from": "2024-04-01",
                    "to": today
                },
                "incremental": {
                    "cursor_path": "updated_at",
                    "initial_value": initial_value
                }
            },
        },
        ...
resources are dlt's name for the different endpoints we want to query in a REST API.
We have defined resource_defaults that are to be applied to all resources by default. In our case, that is the designation of a primary key for each row of data, as well as the default write disposition: On each new run of our pipeline, we want to append the freshly fetched data to already existing data in our destination.
We then supply a list of endpoints we want to query as resources: users and activities.
Our users endpoint is very straight forward. Its response contains data on our employees. IDs, Names, addresses. Since we're a small company, the number of users is very limited. Because of that, we don't need to take care of incrementally loading data here. We can simply overwrite the data in our destination each time our pipeline runs. As such, we overwrite our default configuration and set "write_disposition": "replace". path simply tells dlt which path should be attached to the base_url we have previously defined in the config part.
The activities resource is a bit more interesting. Since we have thousands of activities that get tracked each year, we want to be a little more resource-efficient when querying this endpoint. Instead of querying all data all the time, we only want to query the data that has been updated since our last pipeline run. For this purpose, dlt allows us to configure incremental loads for resources.
Let's look at the incremental part. dlt will use the column we have provided as cursor_path to keep track of which data has already been loaded. On each run of the pipeline, it will look at the updated_at column and store its highest value away for future reference. initial_value allows us to tell dlt where to start on the very first run of the pipeline.
Next, we need to use these configurations as parameters in our query. MOCO's API allows us to filter data that has been updated after a timestamp provided as an updated_after parameter. Here, we reference {incremental.start_value}. On pipeline execution, dlt will fill this value with the latest value from our cursor_path. This way we only query for data that has been updated after the last time our pipeline ran.
We use the from and to parameters in addition to exclude activities that happened before we became an independent company or that will happen in the future, as some of us like to prebook their schedule.

Last but not least:
python
yield from rest_api_resources(config)
We call dlt's rest_api_resources() function. This turns each element of our resources list in the config variable into an actual dlt resource. We yield these for use in a dlt pipeline.
Create a pipeline that uses our source
Creating a pipeline is very straight forward.
python
def load_moco() -> None:
    pipeline = dlt.pipeline(
        pipeline_name="moco-to-local",
        destination="filesystem",
        dataset_name="moco"
    )

    load_info = pipeline.run(moco_source(), loader_file_format="csv")
    print(load_info)
We define a load_moco() function and don't expect it to return anything. We denote this by using -> None.
Within the function we create a pipeline named moco-to-local. We declare a destination. Since we're not yet talking about Data Storage, we stick with filesystem. This allows us to save data locally and easily inspect it after running our pipeline for testing. dataset_name defines under which folder or schema data should be saved in the destination.
We run our pipeline using .run(), passing our dlt source function we have created earlier. We also specify in which format our extracted data should be saved in. Typically this would be something like Parquet, but for now we stick to CSV, as it makes it easier to inspect the data.
Adding config and secrets
It's time to look into the two .toml files in the .dlt folder we have created earlier, but didn't use so far.
Whenever we want to add universally valid configuration to one of our dlt pipelines, config.toml is the place to store it in. When our project grows and we add pipeline after pipeline, we don't want to configure the same things again and again. Instead, we put it here, applying it to our project as a whole.
To make inspecting our data easier while we are working on our pipeline, we can add the following configuration here:
toml
[normalize.data_writer]
disable_compression=true
This makes sure that the CSV files we're writing are readable for us by just opening them. Typically, dlt would have applied compression to make it more storage efficient, but we're not about that yet.
In contrast to config.toml, the secrets.toml file is something not to be shared with anyone. It contains passwords, API keys and other sensitive data required to run our pipelines.
In our case it holds our MOCO API key and the filepath our data should be written to:
[sources.moco_pipeline]
api_key = "<redacted>"

[destination.filesystem]
bucket_url = "data"
With our configuration and secrets added, we're now ready to run our pipeline for the first time.
Running the pipeline
Since everything is neatly bundled in one Python file, executing the pipeline is as easy as running a Python script:
bash
uv run sources/moco_pipeline.py
If we've configured our secrets and config correctly, dlt will have created a data folder within our repository. In it, you will find a folder for each of our resources we have created, as well as some data that dlt uses to keep track of the pipeline's state.
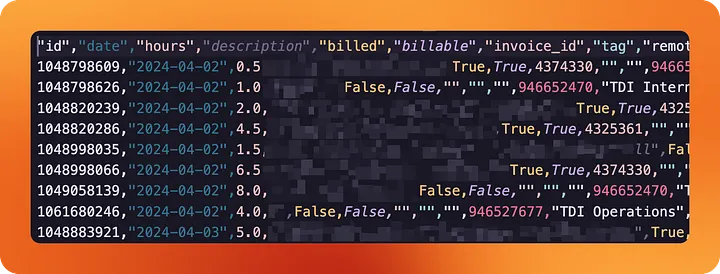
And in fact, looking into data/activities/, we're able to see a CSV file containing all our tracked hours since we started the company.
When using Python to extract data from your company's tools, it doesn't get much easier than this.
Wrapping up
We have configured our first dlt pipeline to extract data from our agency ERP tool. That's a major first step, but that alone doesn't make a data platform just yet.
Instead of writing data to our local filesystem, we want to store it in proper data storage, where it can be analysed and shared with others. The pipelines also need to run automatically, since we don't want to deal with executing the Python script by hand every day.
We'll look into these topics in the next stories of this series, at the end of which you'll be equipped to set up a lean and efficient data platform yourself. Fully owned by you, without vendor lock-in.
The code for this and all other stories of this series can be found on GitHub.
Fed up with unstable pipelines?
Dataform is powerful, but setting up CI/CD can often be nerve-wracking. At The Data Institute, we build data engineering architectures that run stably and scale—whether with Dataform, dbt, or pure SQL.
Let us review your stack: from code audits to pipeline optimization. We'll find the bottleneck.
👉 To the Infrastructure & Data Engineering offering
Ready for your own lightweight data platform?
In a free initial consultation, learn how to set up your data integration quickly and efficiently with the Minimalist's Data Stack — tailor-made for your company.
Ready for your own lightweight data platform?
In a free initial consultation, learn how to set up your data integration quickly and efficiently with the Minimalist's Data Stack — tailor-made for your company.

Ready for your own lightweight data platform?
In a free initial consultation, learn how to set up your data integration quickly and efficiently with the Minimalist's Data Stack — tailor-made for your company.
Related case studies
There are suitable case studies on this topic

Which services fit this topic?